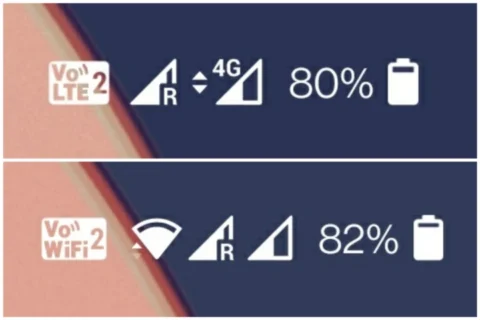
If your carrier supports VoLTE/VoWiFi but not on your device you can easily enable it with some modifications. There is even a Magisk module to forcefully enable.
To enable VoLTE/VoWifi you need to add below lines in your build.prop file.
All you need to edit the build.prop file is a text editor, and a file browser that can access the root directory. Most of these file browsers come with an integrated text editor so you don’t have to think about downloading one just to edit the build.prop file if you don’t already have a favorite editor enabled. Root Explorer, File Explorer Root Browser, and Solid Explorer are some common file browsers capable of doing just about anything a file browser could do. If you have another favorite file browser please let us know in the comments.
When you have a root enabled file browser, navigate to the /system/ folder and scroll down to find the build.prop file. Tap on it and choose ES Note Editor or any other editor installed on the device that you wish to use.
Move the original file into a separate folder and rename it as build.prop.bak before we change the build.prop file and then transfer this file back to the /system/ folder. This way, if anything goes wrong you don’t have to worry, because your system fails to boot. You should delete the changed build.prop from TWRP recovery, and remove the.bak from the name of the backup build.prop. Again your system is booting properly.
With an incredible 13 million lines of code, the Linux kernel is one of the biggest open source projects in the world, possibly. Initially put together by Trovalds, the originally intended Linux kernel currently supports about 30 different architectures with no cross-platform intentions.
If you’re on XDA, you probably have heard about kernels before. The amazing custom kernel that offers a lot of features including but not limited to, more battery life, a smoother interface, maybe exFAT or OTG support, custom color controls, wake-up gestures etc. So, what exactly are custom kernels, and where did a kernel’s entire image get into Android?
Since the inception of computers and devices, there has been a three-tier interaction model.
As you can see, either way the kernel arrives at the second tier. That means that the kernel is the middle man if there is any contact between the operating system and the hardware (such as a volume increase trigger) or between the hardware and the operating system (such as an insertion of a USB device).
So, the next time you increase the volume on your Android device, what actually happens is that Android sends a request to the kernel indicating that the volume needs to be increased, and since the kernel manages the hardware, it raises the voltage for the speaker (which translates loosely into sending a request for a ‘ volume increase ‘ to the speaker); or the time you plug-in a USB device into your OTG-enab
The boot sequence for an Android device looks something like this:
BIOS->Bootloader->Kernel->Operating System.
Google wanted to go with the linux kernel when Android was brought up, a move that was rightly made. The’ mainline’ linux kernel is the kernel used in desktops that can be compiled and run from the linux branch of Trovalds, whereas the kernel of Android is a fork with (relatively) few additions off this mainline kernel. The key reason we can’t run the mainline kernel (the one running on desktops) is due to the lack of support for some of those elements that are required for Android.
The android binder, an Android-specific interprocess communication mechanism, and remote method invocation system. If android decides to write to the display, the OS and the GPU talk through the binder. That should fairly give the idea that *almost* all communications are made through binders.
ashmem/pmem/ion: memory allocators specifically designed for android
logger: to write various logs like kmsg, radio, events, etc.
wakelocks: ever wondered why you get that facebook message on your phone even though it seems to be turned off? voilà. wakelocks at work. (psst. the facebook for Android application holds a LOT of wakelocks, but that’s discussion for another day)
oom handling: OOM stands for Out Of Memory. Since Android devices run low on memory, this is a process killer, the Linux LMK (Low Memory Killer). This is what prevents the device from hanging up by clearing a few running background apps when you open too many of them.
support for YAFFS/JFFS/ file systems: If you’re running older devices, you are probably running a device with flash file systems. These are different from the conventional ext2/3 file systems, and need to be supported by the kernel.
There are various custom kernels to choose from, giving you a plethora of choices. You can either go for a high-performance, overclocked gaming kernel or a battery booster under-clocked, or go with a fair share of both. If you can’t decide, you can go ahead very well and build your own custom kernel with the features that you like since most OEMS release the kernel sources for their devices.
There is no official way for Google apps to be enabled on Huawei smartphones, like the Mate 30 Pro. We want to make this clear from the start. And this is where you should stop reading if you were expecting an official way. Yet there are other ways to do this that give us an alternative way. That’s an open secret. Most of Google’s applications are also free online and easy to use
Installation takes less than 5 minutes to complete. No protection is assured, however, because the circumstances surrounding the situation in Google–Huawei attract people with malicious intent. Copy security specifications for HD streaming of different services can not be enabled. Furthermore, you can not install Google Bill, too.
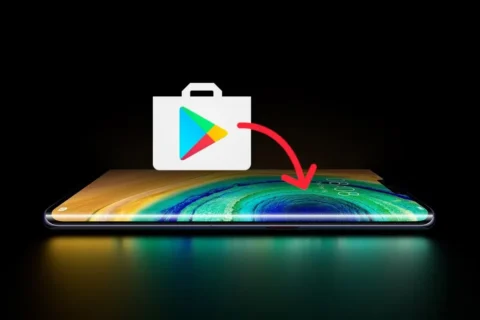
Install Google Service
All you need is the Chat Partner app. Only a few clicks, you can install mobile services on Google more easily than ever before. No prior experience, technical know-how or accessories are needed. Download Partner Chat app HERE
Download, install & start the app
Follow the instructions in the app (see screenshots above)
– Detect device
– Repair Now
– Activate
Restart (!)
Log in to the installed Google Play Store (again) with a Google account
Create additional Google accounts or install Google Apps via the Play Store
Notes!
Despite our extensive tests, app appraisal and observation of possible illegal account activity in the days after the installation, we received a legitimate security
Notice: The login via Webview can be potentially unsafe.
It also seems to be possible to skip this step and restart the device directly in order to then create a Google account via the Play Store or the system settings (secure).
So far, we have not been able to test whether this will lead to restrictions in subsequent use – which we do not assume, however.
The app can also be uninstalled after achieving your goal.
Recovery in Android refers to the dedicated, bootable partition which has mounted the recovery console. A combination of key presses (or command line instructions) will boot your phone back to recovery, where you will find tools to help patch (recover) your computer and install official OS updates. Since Android is open and has the source code available for recovery, it’s also fairly easy to build a customized version with more and different choices.
You can access your phone’s recovery, and perform a number of different functions that are useful to troubleshoot your phone. You can do a factory reset, clear cache, and run system updates with the stock recovery. You can also do system backups and flash. ZIP files like those that will modify your ROM or make big changes to your system if you have a custom recovery.
Press and hold on both the volume up and Bixby buttons (the button just beneath the volume rocker), then press and hold the power button.
Google
Step 1: Long press the power button and volume down button at same time until screen turns on Step 2: Press the volume down button until Recovery mode show Step 3: Press the Power button to enter your Google Pixel 4 XL into recovery mode
Press and hold Volume Up key and Power key simultaneously.
HTC
Navigate to Settings> Battery> Uncheck FASTBOOT. Power phone off Hold VOLUME DOWN + POWER for 5 seconds Release POWER but continue to hold VOLUME DOWN Once you are in the bootloader, use the VOLUME buttons to navigate to RECOVERY Press POWER to select and enter recovery
LG
POWER + VOLUME DOWN Hold until the LG Logo appears Release and immediately press POWER + VOLUME DOWN again until you see the Reset Menu Press the POWER button to hard reset, then you will reboot into recovery
MI User Interface, abbreviated MIUI is an Android-based operating system for smartphones and tablet computers developed by Chinese electronics manufacturer Xiaomi. It is powered by the Android Operating System. MIUI includes various features such as theme support.
Xiaomi’s budget devices are good at taking over the smartphone world.
The company, dominating on the Indian and Chinese markets, manages to deliver low priced smartphones coupled with some high end device specs.
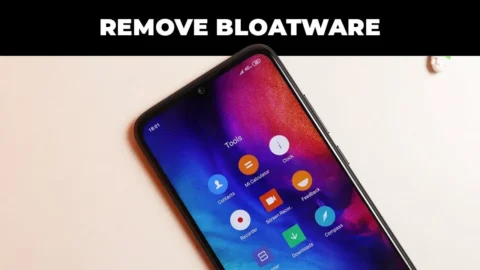
Bloatware on Xiaomi Devices?
The word Bloatware is used for smartphone apps which the vendor locks. Some known vendors include Samsung, Xiaomi, HTC and so on. Developers are using this irksome tactic of locking apps on the phone to make the device’s user interface exclusive.
Uninstall/Disable MIUI Apps in Xiaomi/Redmi Devices Without Rooting
1. MIUI Hidden Settings
The MIUI app Hidden Settings make it easy for developers to perform previously complex tasks in just a few taps. You can, for example, view the Notification log, which has been difficult to get into before.
With the help of MIUI hidden features, you can get rid of some (not all) pre-installed app(You can also uninstall the Google apps).
You need to enable USB debugging by going to Settings > About Phone > Tap 7-10 times on MIUI Version. A popout will appear telling you that you have activated Developer Settings.
Then go to Additional Settings and pap on Developer Options, scroll down and activate USB debugging and press OK.
On your PC go to ADB installation folder and type cmd in the adress bar. A command prompt windows will appear.
Now once you have device connected via USB, run adb devices command in terminal to see if your device is connected via ADB.
Now copy and run the commands from below list for the app which you want to remove.
The command is adb shell pm uninstall -k --user 0 package.name
adb shell pm uninstall -k --user 0 com.google.android.apps.docs # Google Drive
adb shell pm uninstall -k --user 0 com.google.android.apps.maps # Google Maps
adb shell pm uninstall -k --user 0 com.google.android.apps.photos # Google Photos
adb shell pm uninstall -k --user 0 com.google.android.apps.tachyon # Google Duo
adb shell pm uninstall -k --user 0 com.google.android.googlequicksearchbox # Google App
adb shell pm uninstall -k --user 0 com.google.android.music # Google Music
adb shell pm uninstall -k --user 0 com.google.android.videos # Play Movies
adb shell pm uninstall -k --user 0 com.android.browser # Mi Browser
adb shell pm uninstall -k --user 0 com.miui.bugreport # Mi Feedback
adb shell pm uninstall -k --user 0 com.miui.compass # Mi Compass
adb shell pm uninstall -k --user 0 com.miui.notes # Mi Notes
adb shell pm uninstall -k --user 0 com.miui.screenrecorder # Mi Screen Recorder
adb shell pm uninstall -k --user 0 com.miui.videoplayer # Mi Video
adb shell pm uninstall -k --user 0 com.miui.player # Mi Music
adb shell pm uninstall -k --user 0 com.xiaomi.midrop # Mi Drop
adb shell pm uninstall -k --user 0 com.xiaomi.mipicks # Mi Apps
adb shell pm uninstall -k --user 0 com.xiaomi.scanner # Mi Scanner
So if you mess something up, do factory reset to get out of trouble.
A device bootloader is a code which packs in an operating system to run every time we turn on our device. It basically tells the operating system and kernel to whether run recovery mode or initiate the boot process.
Because Android is open-source, it’s quite easy to unlock the bootloader. By unlocking it, you will be able to flash any third-party Custom ROM, Root, Mod files, Custom Recovery,etc ….
This is a simple access to you to tweak your device. Don`t worry, you can even lock the bootloader again.
Before you proceed to unlock the bootloader of your device, you should do a complete back-up of the system. The unlocking process will sweep all the data of Android. So it is important to backup any photos, videos, app data or other files on your device to a computer, an SD card or the online cloud. Backup everything you want to keep, then continue to the next step.
Let`s unlock!
Enable Developer options and OEM Unlock at first on your handset.
Then you need to enable the USB Debugging as well from the Developer options to connect with your PC.
Once the device is connected, switch off your phone and open the fastboot mode. You can do this by opening the command prompt pressing Shift Key + Right Mouse Click on a blank area in the ADB & Fastboot folder on your PC and typing: “adb devices” and then “adb reboot bootloader” (without quotes).
You may get a pop up to allow USB Debugging on your phone. Just tap on OK button.
Please Note: this will delete all the device data completely.
Once your phone is recognized follow the next command: fastboot oem unlock
You’re done. To reboot your device into the main system, type the following command and hit enter button: fastboot reboot
Your phone will reboot into the system. Wait for the complete boot process and enjoy.
WhatsApp is an top notch and revolutionary app. Simple to use, free, and with out a advertising, it isnow notunexpected that it isdesiredvia many users spherical the world. With its written and voice messaging system, the strength to form voice and video calls, it gives a service like that of a telephone.
Many peopleuse it on a each day and percentage tons of private data, that’s why it’scrucial to stay it secure. We, therefore, recommend that you trulydiscovered out two-aspect authentication to your account. This characteristic are going to be especially beneficialonce you log into WhatsApp on another device to feature additional safetyon your profile.
Enable two-factor authentication
There is only one method for two-factor authentication on WhatsApp. Once logged in, the application prompts you to create a custom PIN code.
Enter your personalized PIN code before clicking on next.
Re-enter your personalized PIN code.
Press Confirm.
Enter your email address before clicking on next.
Re-enter your email address.
Press Save.
Press Done.
The two-factor authentication imagined by using WhatsApp has a as a substituteuncommon configuration however well, we do with what we have, as they say. Most important: greater securityfor your data. The best small constraint of this selection is to remember this unique WhatsApp PIN code with a view to be used very rarely. Before developing it, I invite you to choose a password that is easy for you to take into account, butbest for you.
Your warranty will be void.
Droid Tools is not responsible for bricked devices, dead SD cards etc...
Evolution X is a Custom ROM to bring a true Pixel feel to Android Devices at first glance, with many additional options at your disposal. Evolution X aim to provide frequent builds with monthly security patches from the latest AOSP sources.
1. Reboot to Recovery 2. Download the proper flashable ZIP for your device 3. Wipe Data/Cache/System when coming from non-AOSP ROMs 4 Flash MIUI 11 vendor/firmware for your device variant 5. Flash the ROM 6. Reboot to System 7. Reboot to Recovery 8. Flash Magisk (Optional) 9. Reboot to System and #KeepEvolving
Update / Dirty Flash
1. Reboot to Recovery 2. Download the proper ZIP for your device 3. Flash the ROM 4. Reboot to System and #KeepEvolving
LG isn’t known for releasing updates to its Android smartphones in a very timely fashion. But once they do, you are going to want to know the way to get that update and fiddle with the most recent version of Android.
LG does roll out other updates for its smartphones, typically bug fixes and security updates are what LG smartphone owners will get. Which are arguably more important than the remake of Android updates that other phones get. As this keeps your phone and your information from becoming susceptible to being hacked or attacked.
So how exactly do you update your LG smartphone to the newest version of Android? Well it’s quite simple. Let’s start .
Go to System then tap on System Updates and tap Check for new system updates.
After that you will be either prompted by an update, which you can then just start the update. Or there will be a Check Now button you can use to check for a software update.
If there is an update available, you will see detailsof the update and the changelog, if there is one. The update will be large if it’s for a new version of Android. If you don`t want to install the update right now, just hit Later.
Updates do not wipe your data.
S However, it is always smart to go ahead and back up your data before you install a new update, just in case. As something could go wrong and you could end up needing to factory reset your phone following the update.